@vue/cli 创建的项目结构
在前面几节的学习中,你已经掌握了 webpack 构建一个应用的基本配置。本节将通过一个示例帮助你加深对 webpack 的理解。
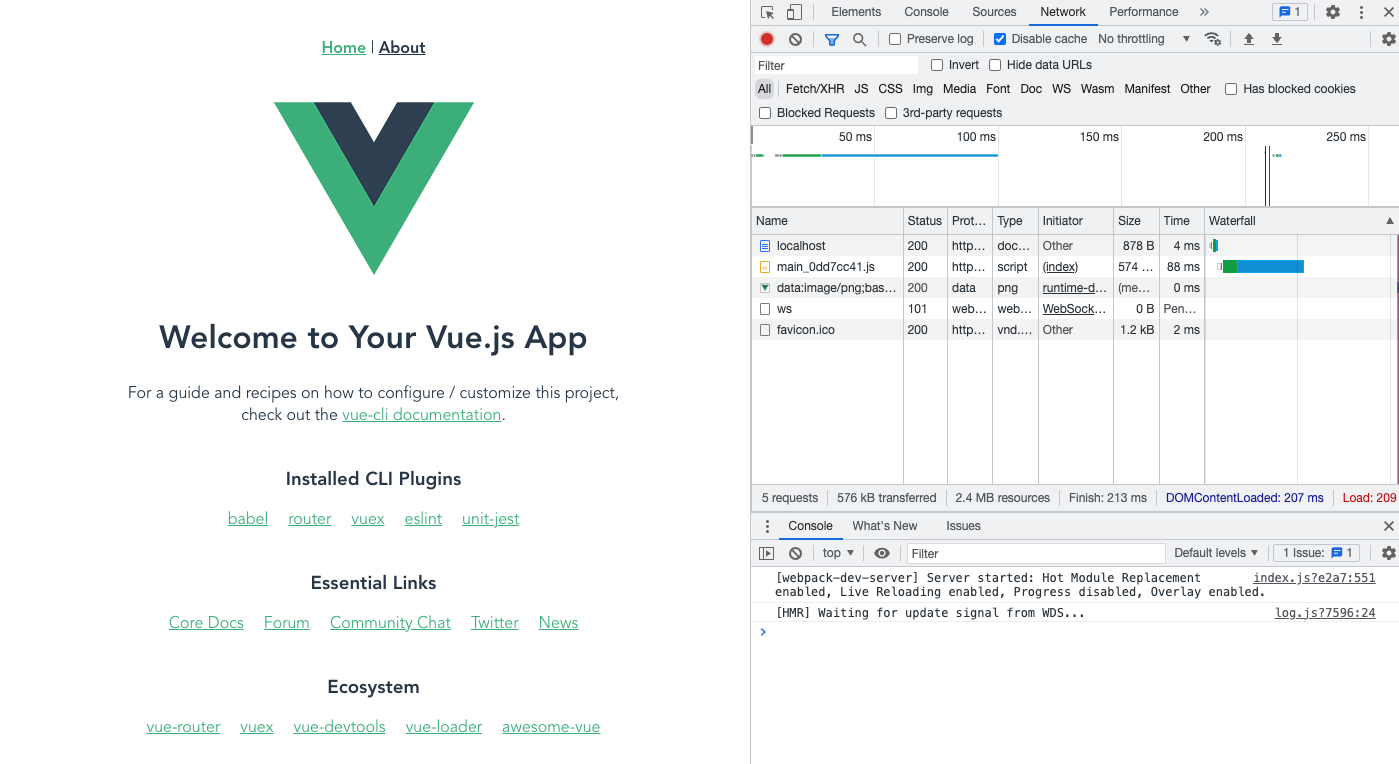
在开始构建示例之前,我们先来看看 @vue/cli 创建的 vue3 项目结构:
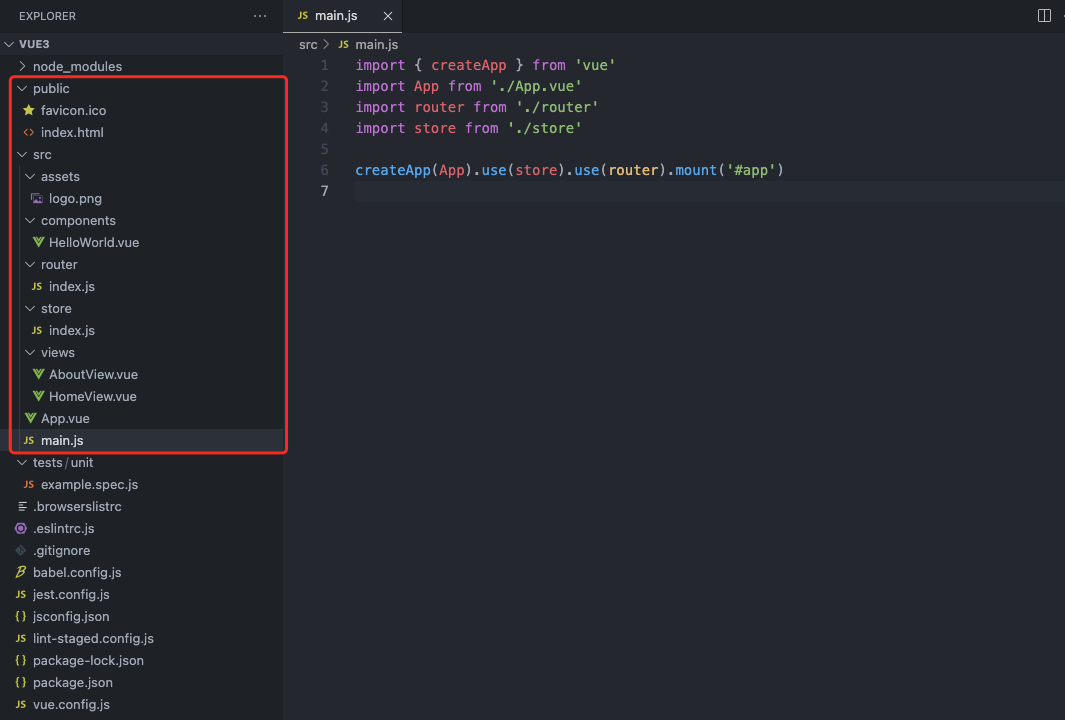
项目中除了 vue、vue-router、vuex 三大件之外,还集成了一些辅助工具,例如 jest、eslint、prettier、lint-staged 等,这些辅助工具比较独立且和 webpack 关联不大可以忽略。我们要做的是在不影响业务功能的前提下对 vue3 项目中的逻辑(红框部分)进行平移,底层从 @vue/cli 更换为 webpack5。
基础配置
初始化 npm:
npm init -y
安装依赖,前几节讲过的依赖这里不再赘述,注意这里新增了一个 cross-env:
npm i core-js -S
npm i cross-env webpack webpack-cli webpack-dev-server webpack-merge @babel/core @babel/preset-env babel-loader style-loader css-loader postcss autoprefixer postcss-loader sass sass-loader clean-webpack-plugin html-webpack-plugin mini-css-extract-plugin -D
| 依赖 | 版本 | 作用 |
|---|---|---|
| cross-env | ^7.0.3 | 支持跨平台设定环境变量 |
这里我们换一种方式编写 webpack 配置,将多种配置写在一个文件中,通过环境变量来判断如何合并对应配置:
webpack.config.js
// 一.nodejs 模块
const path = require('path')

// 二.webpack 插件
const { merge } = require('webpack-merge')
const { CleanWebpackPlugin } = require('clean-webpack-plugin') // 清除目录
const HtmlWebpackPlugin = require('html-webpack-plugin') // 根据模板生成 html
const MiniCssExtractPlugin = require('mini-css-extract-plugin') // 提取 css
const TerserWebpackPlugin = require('terser-webpack-plugin') // 压缩 js

// 三.全局变量
// 生成文件名 hash 规则
const hashRule = '[name]_[contenthash:8]'
// 定义输出的目录
const outputPath = path.resolve(__dirname, 'dist')
// css 公共 loader
const cssLoader = [
  {
    loader: 'css-loader',
    options: {
      // css 中通过 @import 引入的文件,也要先执行 sass-loader + postcss-loader
      importLoaders: 2
    }
  },
  'postcss-loader',
  'sass-loader'
]

// 四.公共配置
const commonConfig = {
  // 单入口 -> 单输出
  entry: {
    main: './src/index.js'
  },
  output: {
    filename: `js/${hashRule}.js`,
    // 指定输出的目录
    path: outputPath
  },
  resolve: {
    // 路径别名:js -> '@/'、css -> '~@/'
    alias: {
      '@': path.resolve(__dirname, 'src')
    },
    // 默认扩展名:.js 必须存在,否则 node_modules 中的文件无法解析
    extensions: ['.js']
  },
  plugins: [
    new CleanWebpackPlugin({
      // 在每次打包前调用:删除输出的目录
      cleanOnceBeforeBuildPatterns: [outputPath]
    }),
    new HtmlWebpackPlugin({
      template: 'public/index.html', // html 模板位置
      favicon: 'public/favicon.ico', // html favicon 位置
      filename: 'index.html', // html 生成模板名
      chunks: ['main'], // 匹配 entry 的key
      title: '7.create-vue', // html 标题
      meta: {
        viewport:
          'width=device-width,initial-scale=1.0,maximum-scale=1.0,minimum-scale=1.0,user-scalable=no', // html 自适应移动端
        description: 'webpack5从不会到入门' // html 描述
      },
      minify: {
        removeComments: true, // html 删除注释
        collapseWhitespace: true // html 删除空白符与换行符
      }
    })
  ],
  module: {
    rules: [
      {
        test: /\.js$/,
        exclude: /node_modules/, // 排除 node_modules 中引入的 js 文件
        use: ['babel-loader'] // 第三方 loader 通过 use 调用
      },
      // 图片 > 100kb 复制到输出目录并将其 url 内联到打包输出的 js 中
      // 图片 < 100kb 作为 dataURI 内联到打包输出的 js 中
      {
        test: /\.(jpg|jpeg|png|gif|bmp|webp|svg|hdr)$/,
        type: 'asset',
        generator: {
          filename: `image/${hashRule}[ext]` // [ext] 代表输出文件原本的扩展名
        },
        parser: {
          dataUrlCondition: {
            maxSize: 100 * 1024 // 临界值设定为 100kb
          }
        }
      },
      // 字体:复制到输出目录并将其 url 内联到打包输出的 js 中
      {
        test: /\.(eot|ttf|woff|woff2|fnt)$/,
        type: 'asset/resource',
        generator: {
          filename: `font/${hashRule}[ext]`
        }
      },
      // 音视频:复制到输出目录并将其 url 内联到打包输出的 js 中
      {
        test: /\.(mp3|mp4|wav)$/,
        type: 'asset/resource',
        generator: {
          filename: `media/${hashRule}[ext]`
        }
      },
      // json、xml:复制到输出目录并将其 url 内联到打包输出的 js 中
      {
        test: /\.(json|xml)$/,
        type: 'asset/resource',
        generator: {
          filename: `file/${hashRule}[ext]`
        }
      },
      // 着色器语言:将文件作为字符串内联到打包输出的 js 中
      { test: /\.glsl$/, type: 'asset/source' }
    ]
  }
}

// 五.开发环境配置
const devConfig = {
  mode: 'development',
  // 精确到行生成 source map
  devtool: 'eval-cheap-module-source-map',
  output: {
    publicPath: '/' // 静态资源的公共路径需要设定为当前项目根路径
  },
  devServer: {
    static: {
      directory: outputPath // 静态文件目录
    },
    port: 3000, // 端口号
    historyApiFallback: true, // 支持单页应用 history 路由 fallback
    open: false, // 禁止自动打开浏览器
    hot: true, // 开启热模块重载功能 hmr
    compress: true, // 开启 gzip 压缩
    client: {
      overlay: true, // 在浏览器端显示编译错误
      progress: false // 在浏览器端打印编译进度
    }
  },
  module: {
    rules: [
      {
        test: /\.(css|scss)$/,
        // loader 的执行顺序是从下到上,从右到左
        use: ['style-loader', ...cssLoader]
      }
    ]
  }
}

// 六.生产环境配置
const prodConfig = {
  mode: 'production',
  // 关闭 source map
  devtool: false,
  output: {
    publicPath: './'
  },
  plugins: [
    new MiniCssExtractPlugin({
      // 抽离 css 文件名
      filename: `css/${hashRule}.css`,
      // 抽离 css chunk 文件名
      chunkFilename: `css/${hashRule}.chunk.css`
    })
  ],
  module: {
    rules: [
      {
        test: /\.(css|scss)$/,
        // loader 的执行顺序是从下到上,从右到左
        use: [
          MiniCssExtractPlugin.loader, // mini-css-extract-plugin 自带的 loader
          ...cssLoader
        ]
      }
    ]
  },
  optimization: {
    minimizer: [
      new TerserWebpackPlugin({
        parallel: true, // 开启多进程压缩 js
        terserOptions: {
          compress: {
            drop_console: true, // 删除 console
            drop_debugger: true // 删除 debugger
          }
        }
      }),
      '...' // 其余保持默认值
    ]
  }
}

// 通过环境变量判断合并开发环境还是生产环境配置
module.exports = merge(
  commonConfig,
  process.env.NODE_ENV == 'development' ? devConfig : prodConfig
)
修改 npm script,脚本名和 @vue/cli 创建的项目保持一致,注意这里利用 cross-env 显式指定了环境变量:
package.json
"scripts": {
  "serve": "cross-env NODE_ENV=development webpack serve --config ./webpack.config.js",
  "build": "cross-env NODE_ENV=production webpack --config ./webpack.config.js"
}
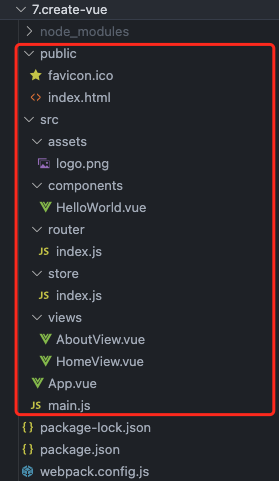
将 @vue/cli 创建项目的逻辑部分复制到根目录下:
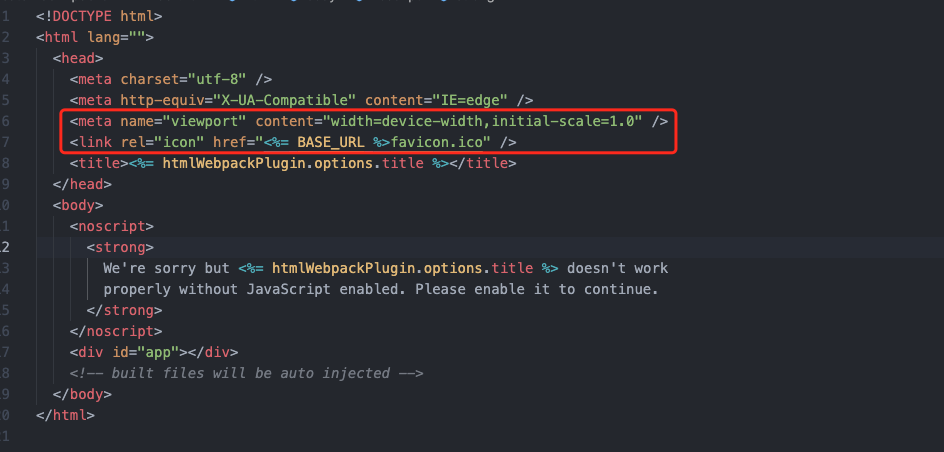
删除 index.html 中两行代码,因为我们已经利用 html-webpack-plugin 注入了 favicon 和 viewport:
修改 webpack 的打包入口,之前我们定义的是 src/index.js,这里更换为 src/main.js:
webpack.config.js
// 四.公共配置
const commonConfig = {
  entry: {
    // 更换为 main.js
    main: './src/main.js'
  }
}
配置 vue3
观察项目发现了新的扩展名 .vue,因此可以判断需要在 module 模块中添加新的 loader 来处理这种文件。使用 vue3 需要安装下面五个依赖:
npm i vue vue-router vuex -S
npm i @vue/compiler-sfc vue-loader -D
| 依赖 | 版本 | 作用 |
|---|---|---|
| vue | ^3.2.45 | vue3 核心模块 |
| vue-router | ^4.1.6 | vue3 路由模块 |
| vuex | ^4.1.0 | vue3 状态管理工具 |
| @vue/compiler-sfc | ^3.2.45 | vue3 单文件编译模块 |
| vue-loader | ^17.0.1 | vue3 单文件编译模块和 webpack 之间的桥接层 |
这里需要特别注意的是,vue 和 @vue/compiler-sfc 的版本必须是一致的,否则编译 vue 代码时会报错。接下来在继续修改 webpack 配置:
webpack.config.js
// 二.webpack 插件
const { VueLoaderPlugin } = require('vue-loader') // vue sfc 文件识别

// 四.公共配置
const commonConfig = {
  plugins: [
    new VueLoaderPlugin() // 配置 vue-loader 内置插件
  ],
  resolve: {
    extensions: ['.js', '.vue'] // 加入 vue sfc 扩展名
  },
  module: {
    rules: [
      // 识别 vue 文件
      {
        test: /\.vue$/,
        use: ['vue-loader']
      }
    ]
  }
}
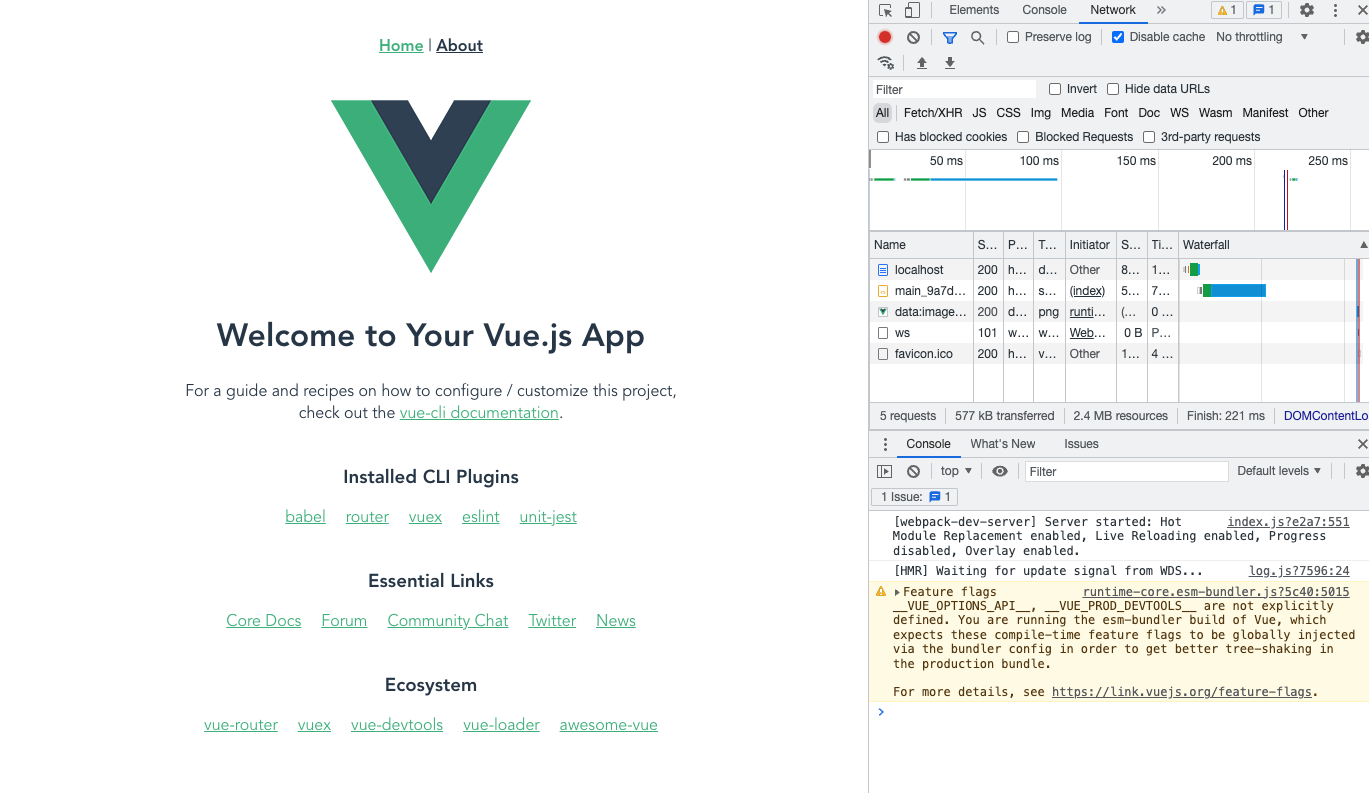
运行 serve 指令后,打开 http://localhost:3000/ 查看页面内容和预期一致,vue 相关代码已成功编译:
解决 warning
完成上一步之后,我们已经成功的构建了一个 vue3 项目。但此时你会发现控制台给出了一段警告:
Feature flags VUE_OPTIONS_API, VUE_PROD_DEVTOOLS are not explicitly defined. You are running the esm-bundler build of Vue, which expects these compile-time feature flags to be globally injected via the bundler config in order to get better tree-shaking in the production bundle.
For more details, see https://link.vuejs.org/feature-flags.
这是因为 vue3 项目默认需要读取两个环境变量 VUE_OPTIONS_API 和 VUE_PROD_DEVTOOLS 来和其他工具协作,而当前项目中并未配置。如果需要为项目注入一个自定义的环境变量,我们可以使用 webpack 自带的插件 DefinePlugin。 继续修改 webpack 配置:
webpack.config.js
// 二.webpack 插件 const { DefinePlugin } = require('webpack') // 四.公共配置 const commonConfig = { plugins: [ new DefinePlugin({ __VUE_OPTIONS_API__ : true, // vue3 开启 options api __VUE_PROD_DEVTOOLS__ : false // vue3 在生产环境中禁用 devtools 支持 }) ] }
重新运行 serve 指令后,打开 http://localhost:3000/ 查看控制台已无相关警告:
